과거에는 개발자가 shared libraries를 사용하기 위해서는자신이 개발하는 package가 지원해야 하는 모든 플랫폼에 대해서 각 플랫폼에만 국한되는 일은 모두따로따로 작업을 해야만 했다고 한다. , configurationinterface를 따로 설계하여 package installer가 어떤 library들을 설치해야 하는지 선택할 수 있도록 해야만 했다고 한다.GNU Libtool platform-specific dependencies user interface에 대한 정보를 하나의 스크립트에 설정할 수 있게 함에 따라 개발자가 예전에 짊어져야했던 많은 짐을 덜어준다. (GNU Libtool manual 서문의 첫 세 문장을 번역한 것이다. 원문을 보는 것이 아마 더 이해가 빠를 것이다. - click "more" to read it)


하지만, 아직 잘모르겠다어쨌든. Linux에서 개발 환경을 구축하는데있어서 GNU Build System을 이해해야 할 필요성을 느끼게 되어 가장먼저 Libtool을 공부하게 되었고, 지금까지 공부한 내용을 예를 들어 정리하고자한다.

* 본문의 내용에 대해서 잘 아시는 분은 틀린부분에 대해서 바로잡아주시고, 명확하지 않은 부분에 대해서는 어떤 보충설명을 하면 좋을지 의견을 남겨주시기 바랍니다.

* 해보시면서 의문이 드는 점도 물어봐주시면 아는대로 성심성의껏 답변해 보도록 하겠습니다.

* 빨간 글씨로 된 부분은 잘 모르겠거나 이해가 안 가는 부분이므로, 이 부분에 대해서 설명해 주실분은 댓글로 친절하게 설명해 주시면 정말 쌩큐베리 감솨 드리겠습니다...


학습목표
- /home/dansoonie/Work/fyi에 libfyi라는 간단한 library를 만들어 build한다.
- /home/dansoonie/
Work/fyitest에서 위에서 build libfyi를 가져다 쓴다
- libfyi를 /usr/lib에 설치한다.
- /home/dansoonie/Work/fyitest에서
/usr/lib에 설치된 libfyi를 가져다 쓴다.

작업 환경:
VMware Player, Ubuntu 8.04 - the Hardy Heron - release in April 2008
libtool version: 1.5.26-lubuntul (1.1220.2.493 2008/02/01 16:58:18)

참고 문헌:
GNU Libtool Manual(첨부파일 참고)


1. Shared Object Library로 만들간단한 소스 작성하기


간단하게 함수 두 개를 가지고 있는 라이브러리를 작성해보자.


/home/dansoonie/Work/fyi/fyi.h listing

#ifndef FYI_H
#define FYI_H

void name();
void birthday();

#endif

/home/dansoonie/Work/fyi/fyi.c listing

#include <stdio.h>
#include "fyi.h"

void name()
{
     printf("Yoon-Soo Lee\");
}

void birthday()
{
     printf("Januaary 18th\n");
}


2. Object File 생성하기


 쉘에서 다음 명령어를 수행한다.($PWD = /home/dansoonie/Work/fyi/)

libtool --mode=compile gcc -g -O -c fyi.c


설명:

     libtool :
libtool 실행 커맨드

     --mode=compile :
mode는 컴파일하기

     gcc -g -O -c fyi.c :
 gcc 실행문
. gcc 옵션은 -c(링크하지 않기)만 꼭 있어야 하고 나머지는 없어도 되는것 같다.

output은

 gcc -g -O -c fyi.c -fPIC -DPIC -o .libs/fyi.o

 gcc -g -O -c fyi.c -o fyi.o >/dev/null 2>&1


생성물은

/home/dansoonie/Work/fyi/fyi.o 

/home/dansoonie/Work/fyi/fyi.lo

/home/dansoonie/Work/fyi/.libs/fyi.o

이다...


shared object library가 지원되는 플랫폼이면 Libtool이 gcc를 실행할때 -fPIC -DPIC 와 같은 옵션을 달아서 실행한다고 한다. PIC가 들어가는 옵션들은 Position-Indipendent code를 의미하므로 shared object library를 만드는데 있어서 매우 중요한 옵션이므로, output에서 그 옵션들이 나오는지 꼭 확인하자 !!!

output의 두번째 줄의 ">/dev/null 2>&1" 은 뭔지 잘 모르겠다... 그냥 gcc의 outputd르 redirect하고 있는것 같은데 정확히 무슨 짓을 하는지는 잘 모르겠다.


3. Library들 link하여 생성하기


 쉘에서 다음 명령어를 수행한다. ($PWD = /home/dansoonie/Work/fyi/)

libtool --mode=link gcc -g -O -o libfyi.la fyi.lo -rpath /usr/lib


설명:

     libtool :
libtool 실행 커맨드

     --mode=link :
mode는 링크하기

    - gcc -g -O -o libfyi.la fyi.lo -rpath /usr/lib :
gcc 실행문. libfyi.la는 libtool control file name으로 확장자가 .a인 standard library name과는 다르다. 어쨌든, 출력을 왜 확장자가 .la인 파일로 정해야 하는지는 잘 모르겠다. fyi.lo는 fyi.la를 출력하기 위해 필요한 파일이고, -rpath 옵션을 통해서 library가 최종적으로 설치(복사)될 경로를 지정해 준다.
질문... /usr/lib, 즉 궁극적으로 설치될 경로를 지정해 주는 이유는 무엇인가? 나중에 libtool을 사용해서 library를 install할때 또 libtool에 argument로 그 경로를 넘겨주는것 같은데 말이다...

output은

 gcc -shared .libs/fyi.o -Wl,-soname -W;, libfyi.so.0 -o .libs/libfyi.so.0.0.0

 (cd .libs && rm -f libfyi.so.0 && ln -s libfyi.so.0.0.0 libfyi.so.0)

 (cd .libs && rm -f libfyi.so && ln -s libfyi.so.0.0.0 libfyi.so)

 ar cru .libs.libfyi.a fyi.o

 ranlib .libs/libfyi.la

 creating libfyi.la

 (cd .libs && rm -f libfyi.la && ln -s ../libfyi.la libfyi.la)


생성물은

/home/dansoonie/Work/fyi/libfyi.la

/home/dansoonie/Work/fyi/.libs/libfyi.a

/home/dansoonie/Work/fyi/.libs/libfyi.la -> ../libfyi.la

/home/dansoonie/Work/fyi/.libs/libfyi.lai

/home/dansoonie/Work/fyi/.libs/libfyi.so -> libfyi.so.0.0.0

/home/dansoonie/Work/fyi/.libs/libfyi.so.0 -> libfyi.so.0.0.0

/home/dansoonie/Work/fyi/.libs/libfyi.so.0.0.0

이다...


4. Library를  executable에 link해서 사용하기


일단 libfyi를 가져다쓸 executable을 테스트로 만들어보자. ($PWD = /home/dansoonie/Work/fyitest/)

/home/dansoonie/Work/fyitest/fyitest.c listing

#include <stdio.h>
#include "fyi.h"

int main()
{
name();
birthday();
return0;
}

 쉘에서 다음 명령어를 수행하여 위의 코드를 컴파일 한다. ($PWD = /home/dansoonie/Work/fyitest/)

gcc -I ../fyi -g -O -c fyitest.c


설명:

    
- -I../fyi :
/home/dansoonie/Work/fyi 디렉터리를 include path에 추가하여 fyi.h가 include될 수 있도록 한다.

     - -g :
debug 정보 포함되도록 컴파일하는 옵션

     - -O :
optimization 하는 옵션

     - -c :
링크는 하지 않는 옵션

생성물은

/home/dansoonie/Work/fyitest/fyitest.o

이다...


fyitest를 libfyi와 링크하여 executable을 만들기 위해서는 쉘에서 다음 명령어를 수행한다.

libtool --mode=link gcc -g -O -o fyitest fyitest.o ../fyi/libfyi.la
* library를 install하기 전에 link를 해서 사용하게 되면 꼭 libtool을 사용해서 link를 해야 한다. Section 3.3 참고


output

gcc -g -O -o .libs/fyitest fyitest.o ../fyi/.libs/libfyiso

creating fyitest


생성물

/home/dansoonie/Work/fyitest/fyitest

/home/dansoonie/Work/fyitest/.lib/fyitest  <- 이 파일 생성의 정체 불명 (실행 안됨)

/home/dansoonie/Work/fyitest/.lib/lt-fyitest  <- 이 파일 생성의 정체 불명 (실행됨)


생성물 실행시 output 결과

Yoon-Soo Lee

January 18th


5. Library를 Install하기


 쉘에서 다음 명령어를 수행한다. ($PWD = /home/dansoonie/Work/fyi/)

libtool --mode=install install -c libfyi.la /usr/lib/libfyi.la

설명
     su 권한 상태에서 명령어를 실행하던지, 저 명령어 앞에 sudo를 사용하여 그 명령어만 su권한으로 실행하도록 한다. 당연히 su 비밀번호는 알아야 한다.

질문... library의 install경로는 libfyi.la에 저장되어있는데 왜 또 따로 /usr/lib이라고 명시해 주었는가? install 명령어 사용 방법이 install [option] SOURCE DEST 라서 그런가? 그리고 중요한 사실은 library를 build할때 -rpath 옵션으로 준 경로랑 위에서 명시해주는 DEST의 경로가 같아야 한다는데, 이렇게 실수를 다분히 유발할 수 있는 여지를 남겨놓은 이유는?

output은

install -c .libs/libfyi.so.0.0.0 /usr/lib/libfyi.so.0.0.0
(cd /usr/lib && { ln -s -f libfyi.so.0.0.0 libfyi.so.0 || { rm -f libfyi.so.0 && ln -s libfyi.so.0.0.0 libfyi.so.0; }; })
(cd /usr/lib && { ln -s -f libfyi.so.0.0.0 libfyi.so || { rm -f libfyi.so && ln -s libfyi.so.0.0.0 libfyi.so; }; })
install -c .libs/libfyi.lai /usr/lib/libfyi.la
install -c .libs/libfyi.a /usr/lib/libfyi.a
chmod 644 /usr/lib/libfyi.a
ranlib /usr/lib/libfyi.a
PATH="$PATH:/sbin" ldconfig -n /usr/lib
-----------------------------------------------------------------------
Libraries have been installed in:
   /usr/lib

If you ever happen to want to link against installed libraries
in a given directory, LIBDIR, you must either use libtool, and
specify the full pathname of the library, or use the `-LLIBDIR'
flag during linking and do at least one of the following:
   - add LIBDIR to the `LD_LIBRARY_PATH' environment variable
     during execution
   - add LIBDIR to the `LD_RUN_PATH' environment variable
     during linking
   - use the `-Wl,--rpath -Wl,LIBDIR' linker flag
   - have your system administrator add LIBDIR to `/etc/ld.so.conf'

See any operating system documentation about shared libraries for
more information, such as the ld(1) and ld.so(8) manual pages.
----------------------------------------------------------------------

library를 가져다 사용할때 header파일으로의 접근을 쉽게 하기 위해 library의 header 파일을 /usr/include로 복사하는 작업을 다음 명령어를 통해 수행한다. ($PWD = /home/dansoonie/Work/fyi/)
cp fyi.h /usr/include 

설명
     su 권한 상태에서 명령어를 실행하던지, 저 명령어 앞에 sudo를 사용하여 그 명령어만 su권한으로 실행하도록 한다. 당연히 su 비밀번호는 알아야 한다.


6. Install된 Library를  executable에 link해서 사용하기


이전에 만들었던 /home/dansoonie/Work/fyitest/fyitest.c 을 사용하자


 쉘에서 다음 명령어를 수행하여 fyitest.c를 컴파일 한다. ($PWD = /home/dansoonie/Work/fyitest/)

gcc -g -O -c fyitest.c


설명:

 
   - -g :
debug 정보 포함되도록 컴파일하는 옵션

     - -O :
optimization 하는 옵션

     - -c :
링크는 하지 않는 옵션

생성물은

/home/dansoonie/Work/fyitest/fyitest.o

이다...


fyitest를 /usr/lib에 install된 libfyi와 링크하여 executable을 만들기 위해서는 쉘에서 다음 명령어를 수행한다.

gcc -L/usr/lib -lfyi -o fyitest fyitest.o


생성물

/home/dansoonie/Work/fyitest/fyitest


최종 생성물 실행시 output 결과

Yoon-Soo Lee

January 18th


질문... -rpath를 /usr/local/lib으로 하면 6번과정을 마치고 ldd fyitest를 하여 fyitest가 어떤 library를 link했는지 살펴보면 libfyi.so.0 => not found 라고 나온다.


Posted by Dansoonie
This post is dedicated to 바람, who is currently confused with the terms that I used on March 17th's post(How is Aggregation and Composition different?) and which Wikipedia uses.

I am assuming that all the confusion started from the word object association which is a term used in Object-Oriented programming paradigm. According to Wikipedia, object association is described as a concept of building objects from other objects [1]. My understanding is that this word has nothing to do with the term association which describes the relationship between objects. The term association is used to define the relationship among objects when their scope does not overlap from one another. The concept of object association is also used to define the relationship among objects, but only when their scope is nested inside one another.

Recall that association is also called a "knows-a relationship" while aggregation and composition is called a "has-a relationship". I personally think that these simplified terms are descriptive enough for everyone to understand this topic better.

If I would elaborate more on association, association provides a mechanism to an object to interact between other objects within its own scope. If my explanation isn't clear for you and wish for more information, refer to [2]. For aggreation and composition, refer to [3].

Basically, my point here is that not to be confused with association among objects and the concept of object association.


References
[1] http://en.wikipedia.org/wiki/Object_association
[2] http://en.wikipedia.org/wiki/Association_%28object-oriented_programming%29
[3] http://en.wikipedia.org/wiki/Object_composition#Aggregation
Posted by Dansoonie
When you would like to carry out a certain task regularly over time, you would use some kind of timing event so that the task could be taken place whenever an event arises. For Win32 applications,

UINT_PTR SetTimer(      
    HWND hWnd,
    UINT_PTR nIDEvent,
    UINT uElapse,
    TIMERPROC lpTimerFunc
);

and the associated event handler

Sub OnTimer
(
    bstrURLItem As String,
    lFlags As LONG
)


would be a perfect option to use.

However, the accuracy of the timer can be very poor for some situations. An accuracy test performed by Chih-Hao Tsai at the University of Illinois at Urbana-Champaign indicates that the accuracy of SetTimer showed average error of 10 ms [1].

I found this out since I had to sample some data from hardware within 10 ms at work. The max resolution that I was able to acheive with SetTimer() was about 15 ms. The reason for the (relatively) inaccurate timing could be found from Windows NT SRMS Service research page by Azer Bestavros and Adrian Prezioso at [2]. Apparently, the 15ms resolution wasn't good enough. So I was looking for a better solution.

After doing some research (but more like web surfing), I found out that the Multimedia Timers provided in Winmm.lib guarantees better timing resolution. Reported to provide resolution up to 1 ms. [3] is an excellent reference written by Nemanja Trifunovic for Multimedia Timers and some other various timers as it discusses their characteristics and uses.

In [3] there are some tiny details that I suppose were omitted accidentally by the author. But I also forgot what it was. I will try to include that information later asap.


REFERENCES

[1] http://web.archive.org/web/20010621175106/home.educities.edu.tw/hao/hao510/w98timer/

[2] http://www.cs.bu.edu/groups/realtime/SRMS-NT/index.htm
[3] http://www.codeproject.com/KB/system/timers_intro.aspx
Posted by Dansoonie
대학교때 C++을 통해서 객체지향을 배우면서 Class와 Class와의 관계를 어떻게 정의하고 코드로 어떻게 표현하는지 배웠다. Class와 class와의 관계중에 가장 기본적이고 대표적인것이 아마도 Aggregation과 Association일것이다. 학교에서 객체지향에 대한 개념 배울때 그것만 중점적으로 배워서 그런지 (사실 처음 배울때는 그런 관계도 명확히 하는것이 어렵기도 하지) 아직까지도 UML 그릴때 aggregation과 association만 사용한다.

하지만 요즘에 회사에서 일하면서 간혹 class diagram을 그리기 위해 공짜 UML 툴 중에 Star UML이라는 Tool을 사용하는데, 그 툴을 통해서 평소에 알지 못했던 Composition이라는 관계를 class간에 정의 할 수 있음을 발견하였다. Composition과 Aggregation의 관계를 보여주는 기호도 비슷했다.


그렇다면 이 둘의 차이점은 무엇인가? 보통 Association은 "knows-a" 관계라고 부른다. 반면 Aggregation은 "has-a" 관계라고 배워왔다. 하지만 내가 이해한 composition에 대해서 우선적으로 대략적으로 말하자면 그동안 내가 알아왔던 aggregation이 사실은 composition이고, aggregation은 association의 탈을 쓴 composition이다.

내가 그동안 이해했던 aggregation이라는것은 다음과 같다.
어떤 클래스가 다른 클래스를 member로 가지고 있다면 그것은 "has-a"관계이고 곧 aggregation이다. 하지만 이것이 composition이고, 가끔 "has-a"관계가 더 맞지만 동적으로 그 object을 생성해야 하는 경우가 있었고, 그럴때는 pointer를 사용해야 해서 모양새가 association인것과 같은 경우가 있었는데, 이런 경우에 aggregation을 사용해야 한다. 그래서 Aggregation은 composition과 같이 "has-a"관계이지만 동적으로 할당해야 해서 pointer를 사용해야 하는 경우 정의된다고 할 수 있는것 같다.

그렇다면 두 경우 모두 pointer 형을 사용하는 association과 aggregation의 차이는 다음과 같이 말할 수 있다. Association은 클래스 내에서 포인터를 통해서 다른 object로의 access를 가능하게 해주지만 이 관계를 성립해주는 곳은 두 클래스의 scope 밖이다. 반면 aggregation은 한 object로의 access를 가능하게 해주는 곳이 그 class 내이다. 즉, 동적으로 할당되는 위치도 그 class의 scope 내이다.

class A_composition
{
private:
   B pb;
public:
   A_composition();
   ~A_composition();
};

class A_aggregation
{
private:
    B* pb;
public:
    A_aggregation();
    ~A_aggregation();
};

class A_association
{
private:
    B* pb;
public:
    A_association();
    ~A_association();
    void AknowsB(B* b);
};

class B
{
public:
    B();
    ~B();
};


위와 같이 네 class가 있다면...
Composition은 class A_composition과 같이 그 class 내에서 다른 class object를 멤버를 가지고 있는것 만으로 성립되는 관계이고,

Aggregation은 class A_aggregation처럼 class 내에 class B의 포인터형을 member로 가지고 있으며 그 pointer를 통해서 class B의 object로의 액세스를 가능하게 해준다. Class B object는 class A_aggregation에서 동적으로 할당되어 사실상 class A_aggregation이 class B object를 가지고 있는 형태가 되어야 하고, 꼭class A_aggregation의 scope내에서 동적으로 할당되어야 한다.
예를 들면...
A_aggregation::A_aggregation()과 같은 constructor나 A_aggregation의 method 내애서
pb = new B()

와 같은 구문을 사용해서 동적으로 할당되어야 한다.

반면 Association은 Aggregation처럼 class 내에 다른 class object로의 pointer를 member로 가지고 있지만, 그 object가 생성되는 위치는 Aggregation의 예와는 다르다. Association은 class A_Association처럼 memeber로 class B의 pointer형을 member로 가지고 있지만, Aggregation의 예에서와는 다르게 class B의 object는 A_association의 scope 밖에서 생성되어야지만 class A_association과 class B와의 관계가 association이라고 할 수 있다.
그래서 aggregation에서의 예와는 다르게

A_association a;
B b;
a.AknowsB(&B);


이런식으로 A_association과 b가 서로의 scope가 아닌 곳에서(위의 예에서 처럼 같은 scope에서 생성될 필요는 없다) 생성되고, A_association의 AknowsB와 같은 method를 통해서 association의 관계를 성립시켜주어야 한다.

이것이 내가 이해한 Composition, Aggregation, 그리고 Association의 차이다...
Posted by Dansoonie
우연히 다른 사람의 블로그를 돌아다니다가 참 기발한 글을 발견했다...
Swap을 변수 없이 할 수 있다는 글이었다...
(http://oneil.cafe24.com/tatter/28?TSSESSION=320992d2262813b724e59568228f6253)

방법은 다음과 같다...

a ^= b
b ^= a
a ^= b

or

a = a+b
b = a-b
a = a-b

Very clever... 아니면 나만 모르고 있었나? Anyway, 추가적인 변수 없이 swap을 할 수 있다는 사실은 performance 향상 및(생각해보니 performance 향상은 그다지 없을것 같다) resource의 효율적인 활용을 의미한다... 하지만... 이것은 정수에 한해서만 가능할것 같다. 그래서 나는 이 방법을 굳이 권하고 싶지 않다.

객체지향 언어에 있어서 있어서 가장 중요한 aspect중에 하나는 reusable code이다. 그리고 정말 reusable한 code를 만들기 위해서는 template을 사용하는것은 불가피하다고 생각한다.
변수값간에 swap은 sorting 할때 많이 쓰이는데 sorting 은 정수 뿐만 아니라 어떤 형태의 data에도 해야만 하는 경우가 생길 수 있기 때문에 보통 sort algorithm은 template으로 구현하지 않나?
그래서 정수에 한해서만 swap이 가능한 저 방법은 좋지 않다고 생각한다...
그리고 요새 컴퓨터의 발달로 요새는 performance나 resource efficiency 보다는 code의 reusability 또는 maintainability에 더 중점을 두고 소프트웨어를 설계하는 경향이라고 생각한다.

하지만... 만약 data structure에 저장된 data의 탑이 pointer형이라면... pointer는 정수값을 가지고 있으니 위의 방법을 응용해서 써도 되지 않을까 싶기도 하다... On the other hand, 변수를 하나 사용해서 일반적으로 널리 알려진 방법대로 swap을 하는 경우와 위의 방법으로 assignment 대신 다른 operation을 통해서 swap의 효과를 얻는다고 해서 얼마나 큰 효과를 볼 수 있을까 싶기도 하다... 어차피 assignment operation이나 XOR같은 operation은 모두 한 사이클에 벌어질법한 일들이니까...
아닌가?

어쨌든, 변수 하나 아낄 수 있다는것으로 만족할만한 당신이라면... 저 방법을 쓰시오...
하지만 굳이 data structure에 pointer형으로 저장할 필요가 없음애도 불구하고 pointer형을 쓴다면 극서에 따른 overhead도 있을테니... 잘 고려해보세요~

여러분들의 생각은 어떠세요?

Posted by Dansoonie
Windows 용 응용프로그램을 만들 경우에, console 프로그램이 아닌경우에는 실행시에 window의 초기 위치와 크기를 정해주고 싶은 경우가 있을것이다. 나는 몇일전에 있었다~

쉽게 할 수 있는 방법을 정리하고자 한다.

우선 코드를 논하기에 앞서서 내가 사용한 방법을 간략히 설명하자면, MainFrame class에 WM_SHOWWINDOW message에 대한 event handler를 만들어주어 그 안에서 WINDOWPLACEMENT structure를 이용했다.

void CMainFrame::OnShowWindow(BOOL bShow, UINT nStatus)
{
    CFrameWnd::OnShowWindow(bShow, nStatus);
    // 창이 보이는 시점이 프로그램 실행 후 최초인지 판별하기 위한 변수
    static bool once = true;  

    // 창이 보이는 시점이 프로그램 실행후 최초인지 검사하는 구문
    if (bShow && !IsWindowVisible() && once) 
    {
       // 프로그램 실행후 이곳은 한번만 실행되도록 once를 false로...
       once = false;

       // 창의 위치에 대한 정보를 담을 변수 min, max
       // min: 창의 좌측 상단의 좌표
       // max: 창의 우측 하단의 좌표
       // 아래에 사용된 숫자는 임의로 사용한 숫자임
       POINT min, max;
       min.x = 100;
       min.y = 100;
       max.x = 500;
       max.y = 500;
  
       WINDOWPLACEMENT lwp;
       lwp.length = sizeof(WINDOWPLACEMENT);
       lwp.flags = SW_SHOWMINIMIZED | WPF_SETMINPOSITION;
       lwp.showCmd = SW_SHOW;
       lwp.ptMinPosition = min;
       lwp.ptMaxPosition = max;
       lwp.rcNormalPosition = CRect(min, max);
       SetWindowPlacement(&lwp);
    }
}


WINDOWPLACEMENT structure에 대한 구체적인 설명은 MSDN을 참고하시기 바라며...
Visual C++ 6.0 MFC에서의 WINDOWPLACEMENT structure documentation (http://msdn2.microsoft.com/en-us/library/aa253040(VS.60).aspx)

추가적으로 창의 최대 크기 및 최소 크기 지정하는 방법까지 설명하겠다...
Window의 최대 크기 및 최소 크기에 대한 정보를 지정하는 방법은 WM_GETMINMAXINFO message에 대한 event handler를 만들어주는 것이다. 아마도 창의 사이즈가 변경될때 OnGetMinMaxInfo를 불러 창 크기의 최대값과 최소값에 대한 정보를 읽어와 동작에 대한 constraint가 주어지는것 같다...
하지만 이것은 내 생각일뿐... 진실은 저 너머에...ㅎㅎㅎ

void CMainFrame::OnGetMinMaxInfo(MINMAXINFO* lpMMI)

    // 최소 크기일때 가로폭
    lpMMI->ptMinTrackSize.x = 1000;
    // 최소 크기일때 세로폭
    lpMMI->ptMinTrackSize.y = 700;
    // 최대 크기일때 가로폭
    lpMMI->ptMaxTrackSize.x = GetSystemMetrics(SM_CXSCREEN);
    // 최대 크기일때 세로폭
    lpMMI->ptMaxTrackSize.y = GetSystemMetrics(SM_CYSCREEN);
    CFrameWnd::OnGetMinMaxInfo(lpMMI);
}

GetSystemMetrics(SM_CXSCREEN) 및 GetSystemMetrics(SM_CYSCREEN)은 현재 설정된 해상도의 가로폭과 세로폭에 대한 정보를 return해준다. 이 정보를 사용하면 해상도에 따라 적절한 창의 크기 및 위치를 설정해 줄 수 있다. 또한 나의 경우에는 OnGetMinMaxInfo에서 설정해준 창의 최소 크기의 값을 사용하여 창의 위치를 정해줄때 화면 한가운데에 놓이도록 숫자를 입력하였다. 그러기 위한 숫자들은 수학을 잘하는 당신들이 알아서 해보세요~


Posted by Dansoonie
Until I started to work, there wasn't much chance for me to look at how real world code really works. In other words, I programmed in my own fashion and I only had to use my own codes. However, I had to write MFC applications as I started to work. I realized that many of the methods for MFC were written and used very differently from how I used to write methods.

When passing by parameter to a function in an in/out fashion, I usually use the following function signature.

// Foo case: parameter is passed by reference
void Foo(int& a);

But, the functions or methods written for MFC usually use the following signature for in/out parameters.

// Bar case: parameter is a pointer type
void Bar(int* a);

So, what's the difference?
Here is my explanation according to my opinion. The function signature that I usually use for in/out parameters explicitly shows that it is passed by reference like the Foo case. I say "explicit" because you can know the parameter is passed by reference just by looking at the function signature. However, in the Bar case, the parameter is passed by reference implicitly by passing a pointer type. Even though they both have the same affect on the parameter, the Bar case does not necessarily mean that the parameter is passed by reference. They both have the same affect on the parameter, but keep in mind that all parameters are passed by value in C++. Therefore, passing a parameter by reference only works by passing an address of a variable (or an object). For that reason, I am saying that passing a pointer to a function does not necessarily mean that you want the parameter to work in an in/out manner.

Sometimes you simply want to pass a pointer. In that case you should limit the side affect on the parameter by using the const keyword. So, if that is the case function Bar should be written

void Bar(const int* const a)

but let's don't discuss that here.


On the other hand, the situation looks slightly different in the client code like the following.

int b;
Foo(b);     // calling Foo(int& a)
Bar(&b);   // calling Bar(int* a)

By looking at the code, you won't be able to tell whether b is passed by value or reference for Foo. Since the parameter passing scheme of Foo is indeterminable in the client code, I personally think that using a pointer type for in/out parameter is better to use than passing a parameter to a function by reference explicitly in the function signature (in other words Bar is better than Foo). Using the '&' to declare the parameter to be passed by reference in the function signature makes the intention clear in the function signature itself only. But by using a pointer type parameter, you can at least guess that the parameter is in/out by looking at the function signature and maybe it becomes clearer when you look at how it is used the client code. Besides, as I mentioned in the colored quoted section above, if you want to pass a pointer to the function and avoid side affects, you should use the const keyword.

So, my conclusion...
For code readability issues, I personally think that functions that require in/out parameters should be written in the Bar way rather than the Foo way.


Posted by Dansoonie
It's been a while since I have learned C++ from school. The last time I heard about circular dependency in C++ was from my sophomore year in college. Yesterday, I was having trouble making circular dependency to get working. I decided to post about how I solved the problems I had considering that circular dependency isn't a situation you encounter very often. I usually get rusty on things I don't do often. Hopefully, many people are like me and some may benefit from this post sometime later.


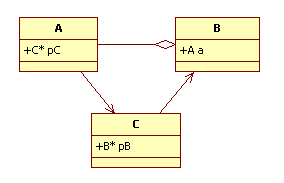
While at work designing an application, I encountered a situation where two classes had attributes of their own referring to another class in the following manner.
사용자 삽입 이미지
I recognized that this resulted in a circular dependency and included a forward declaration in the header file of each class for the class that it was referring to. So the header file for each class resulted in the following.
 
// A.h
class B;   // forward declaration for class B
class A
{
    private:
       B* pB
    public:
       ...
};

// B.h
class A;    // forward declaration for class A
class B
{
    private:
       A a;
    public:
       ...
};
However, I got a compile error indicating that class A and B were not defined. It was weird at first because I thought I got my circular dependency problem solved. I had no idea how to get around the compile error. My solution to this was to create another class to use it as a mediator for the establishing an associative relationship between class A and B. My new design was like the following.
사용자 삽입 이미지
I was stupid enough to think that this new design will avoid the circular dependency relationship. But after another build of my application, I figured that this also results in a circular dependency. If you look carefully at the #include statements in each header file for class A, B, and C,
    - A.h includes C.h
    - C.h includes B.h
    - B.h includes A.h
, but then B must compile A.cpp and A cannot be compiled because C and B has not been compiled. Therefore, class A is not defined and the circular dependency prevents the code to be compiled in spite of the forward declarations.

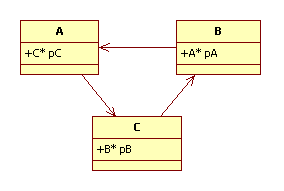
At this point, I realized that class A does not require C.cpp to be compiled. This is because that  class A refers to class C with a pointer. As you all know, pointers are usually a 4 byte (32 bit) integer and as long as the type of the pointer is specified, the code compiles. From what I have just realized, I decided to change my design like the following.
사용자 삽입 이미지
I could have gotten rid of class C but I kept it for another good reason (design issue in my application). As I changed all my inter class relationship into association, the code compiled as I expected and also worked fine.


The point I would like to make here is that it is important that you know that circular dependency only works only when classes are associated with each other based on pointers.

 Was this so obvious?
Posted by Dansoonie
Are you having trouble using the CSpinButtonCtrl in MFC?
Then what kind of trouble are you going through?

In my case, I was having trouble with setting the range of the spin button control. I needed to set the range from 0 to 0xFFFF. The default range of CSpinButtonCtrl is from 0 to 100. And the range can be modified by using the SetRange method. However, the range must be defined within the range -0x8000~0x7FFF inclusive.  Moreover, if I remember correctly, the difference between the max and min of the range must not exceed 0x7FFF. I am pretty sure that not many people would have been happy with this limitation. To overcome this limitation, I guess Microsoft added a method called SetRange32 for the CSpinButtonCtrl. The SetRange32 method has no limits on setting the range within the 32 bit integer range. But does this mean that there absolutely no limitations on using the CSpinButtonCtrl within the 32 bit integer range?
No !!!
I believe another method frequently used in CSpinButtonCtrl among with SetRange is SetPos and GetPos method. Now comes the funny part. Even though you set the range for the CSpinButtonCtrl with SetRange32 method, SetPos and GetPos operates properly within the 12 bit interger range, which is -0x8000~0x7FFF.

After some research I found out that you can get and set the position of the CSpinButtonCtrl by sending UDM_SETPOS32 and UDM_GETPOS32 message to the CSpinButtonCtrl object. So the code will become something like the following...

// Assume that the control ID of the CSpinButtonCtrl is IDC_SPIN
CSpinButtonCtrl spinButtonCtrl;
// set range
spinButtonCtrl.SetRange32(0, 0xFFFF);

// 1. how to set position
// nPos is the new position
// (valid position within the range specified above)
GetDlgItem(IDC_SPIN)->SendMessage(UDM_SETPOS32, 0, nPos);
//2. how to get position
int pos = GetDlgItem(IDC_SPIN)->SendMessage(UDM_GETPOS32, 0, NULL);

The requirements for being able to do this is having comctl.dll version 5.8 or later and commctrl.h. I figured out that the version of my comctl.dll is 5.82. But I had some problems with commctrl.h. At the moment, I have two versions of Visual Studio. Version 6.0 and 2005. The commctrl.h that Visual Studio 2005 refers to has the following lines.

#define UDM_SETPOS32 (WM_USER+113)
#define UDM_GETPOS32 (WM_USER+114)

On the otherhand, the commctrl.h that Visual Studio 6.0 refers to does not define the messages UDM_SETPOS32 and UDM_GETPOS32.

Knowing that the value defined for UDM_GETRANGE32 is WM_USER+112, here is what I did...

// 1. how to set position
// nPos is the new position
// (valid position within the range specified above)
GetDlgItem(IDC_SPIN)->SendMessage(UDM_GETRANGE32+1, 0, nPos);
//2. how to get position
int pos = GetDlgItem(IDC_SPIN)->SendMessage(UDM_GETRANGE32+2, 0, NULL);


On second thought I decided to define my two messages on my own. So I added the two lines that were absent in my commctrl.h in my source code and used UDM_SETPOS32 and UDM_GETPOS32 where I actually send the message to the CSpinButtonCtrl in the code.

On the third thought, I had a better idea. I created my own class derived from CSpinButtonCtrl called CSpinButtonCtrl32. I defined SetPos and GetPos method in the following manner.

#define UDM_SETPOS32 (WM_USER+113)
#define UDM_GETPOS32 (WM_USER+114)

int CSpinButtonCtrl32::SetPos(int nPos)
{
    int prevPos = this->SendMessage(UDM_GETPOS32, 0, NULL);
    this->SendMessage(UDM_SETPOS32, 0, nPos);
    return prevPos;
}

int CSpinButtonCtrl32::GetPos()
{
    return this->SendMessage(UDM_GETPOS32, 0, NULL);
}

And everthing worked just as I wanted. Spin Button Control without much limitations on setting the range and setting/getting the position.


Posted by Dansoonie
1. Introduction
Serial Port 통신 프로그램을 만들면서 애를 많이 먹었던 이유는 직렬 포트의 버퍼를 그대로 내 프로그램의 버퍼로 이용하려고 했기 때문인것 같다. 하지만 나는 아직도  굳이 프로그램에서 버퍼를 구현할 필요가 있나 싶다. 어쨌든, 내 프로그램에서 버퍼를 구현함으로써 직렬 포트 통신을 가능하게 했으니 이젠 그 문제는 나를 신경쓰이게 하지 않는다...


2. Revisiting the Problem
애초에 내가 고민했던 thread를 사용하게 됨에 따라 생기게 될 문제는 사실 문제가 아니었다. 처음에 가지고 있던 고민은 내가 직렬 포트에 연결된 device에 어떤 request를 보내고 그것에 대한 response를 받아야 할 경우에 request에 대한 정보가 아닌 연결된 device에서 보낸 독립적인 정보이면 이 정보와 애초에 request에 대한 response를 어떻게 분간하는가에 대한 고민이었다. 하지만 이것이 크게 문제가 되지 않는 이유는 특정한 상황이 아니면 직렬 포트에 연결된 device에서 request와 독립적인 어떻한 정보도 보내지 않기 때문이다. 이 시나리오의 발생 가능성이 전혀 없는건 아니지만, 발생해서 문제가 생긴다 하여도 이것은 프로토콜의 문제라고 생각한다. 그리고 모든 요청은 직렬 포트를 타고 순차적으로 이루어지고 요청에 대한 응답은 순차적으로 오기 때문에 여러 요청에 대한 응답을 구분하는것도 큰 문제가 되지 않음을 깨달았다. 직렬 포트 통신 구현을 위해 가장 핵심적인것은 직렬 포트에서 수신된 데이터를 얼마나 자유자재로 읽어올 수 있느냐가 가장 큰 관건이라는 결론이 나왔다.

보통 다른 사람들이 구현한 직렬 포트 통신 프로그램을 보면 자체 버퍼가 존재했지만 내가 애써 프로그램 내에서 따로 버퍼를 구현하지 않으려고 했던 이유는 단지 프로그램 자체를 작고 간결하게 유지하고 싶어서였다. 그리고 직렬 포트의 버퍼를 내 마음대로 읽어올 수 있다면 크게 문제가 되지 않을것으로 보였다. 하지만 결국 내 프로그램에 자체 버퍼를 구현하게 된 가장 큰 이유는 직렬포트 버퍼를 내 마음대로 자유자재로 읽어오지 못했기 때문이다...

단순히 MSDN에서 제공하는 문서만 가지고서는 내가 원하는 만큼의 자유도로 버퍼를 읽어올 수 없었다. 그래서 Queue를 사용하여 버퍼를 구현했다. 구체적으로는 Array를 사용한 Circular Queue이고, 학교 다닐때 몇시간씩 시간을 투자해서 만들었던 queue를 단지 20분만에 후딱 만들어버렸다. 이젠 너무나 당연한 것일지도 몰라도 내 스스로도 놀랐다 ㅡ.ㅡ;


3. Solution
3.1 Basic Structure
내 프로그램의 구조는 이렇다. 일단 Windows API로 직렬 포트에 접근하는것을 간결하게 하기 위해 SerialPort이라는 wrapper class를 만들어서 직렬 포트로의 read, write을 담당할 메소드들을 생성했고, receive buffer의 역할을 담당할 Queue를 멤버를 가지고 있다.

그리고 Global Scope에서 SerialPort object를 매개변수로 받는 thread를 만들었다. 이 thread에서는 직렬포트가 열려있는 동안 무한 루프를 돌면서 직렬포트의 버퍼에 데이터가 수신되었는지 감시하여 데이터가 도착하면 Queue에 데이터를 enqueue하도록 하였다. 무작정 무한 루프를 돌리면서 직렬 포트 버퍼에서의 데이터 유무를 판단하는 Polling 방식을 사용하면 CPU cycle을 너무 많이 소비하기 때문에 WaitCommEvent()를 사용하여 평상시에는 잠들어있다가 직렬 포트에 데이터가 수신되었다는 event가 발생할 때에만 수신된 데이터를 Queue로 옮겨 넣는 작업을 수행하도록 했다.

3.2 Synchronization between threads and the process
Thread를 사용하게 됨에 따라 race condition이 발생하게 되는데, 크게 두 곳에서 발생할 수 있다. 한 곳은 직렬포트 자체의 버퍼이다. 또 한곳은 내가 구현한 queue에서 이다.

- 직렬 포트 버퍼에서 read, write operation에 대한 race condition 해결책
그동안 overlappedIO에 대한 개념이 잘 이해가 안갔지만 내가 이해한 것을 바탕으로 설명하면 직렬 포트 통신에서 overlappedIO를 사용하는 이유는 다음과 같다. 직렬포트에 자칫 rx buffer,와 tx buffer가 따로 존재한다고 생각하면 문제가 되지 않을 수 있다고 생각할 수 있을지도 모른다. 하지만, Windows API에서 직렬포트를 접근하는 방식은 file에 접근하는 방법과 똑같다. 파일에 동시에 읽고 쓸 수 없듯이 직렬 포트에서도 마찬가지이다. 그래서 overlapped structure를 사용해 read와 write시에 event를 발생하여 직렬 포트로의 read와 write operation이 동시에 직렬 포트에 접근하지 않도록 한다.

- SerialPort class 내에서 queue의 enqueue, dequeue operation에 대한 race condition 해결책
만약 수신된 데이터를 읽고 싶다면 SerialPort에 만들어둔 read 관련 메소드들을 사용하여 queue에 데이터를 dequeue 한다. 반면 직렬 포트를 감시하고 있는 thread는 데이터 수신시 queue에 데이터를 enqueue 한다. Main process와 thread에서 모두 SerialPort의 queue에 접근하기 때문에 스레드와 main process를 서로 동기화 시켜주어서 context switching이 발생하는 동안 queue에 서로 접근하는 것을 방지할 필요가 있었다. 그래서 Windows API에서 제공하는 CriticalSection object를 사용하여 queue class 내에서 queue의 data structure인 array에 접근할때는 항상 EnterCriticalSection(), LeaveCriticalSection()을 해주었다. 이렇게 하여 queue에 대해서 어느 순간에든지 한 process, 또는 thread만이 queue에 접근하도록 했다.


3.3 Exceptional Read Cases
경우에 따라서는 write operation으로 request를 보낸 후 read operation으로 응답을 바로 읽어오게 되는데 재빨리 응답이 오지 않는 경우가 있다. 그리고 응답이 오기까지의 시간은 정해져있지 않은 경우도 있다. 그런 경우에는 SerialPort object의 queue에 데이터가 채워질때까지 무작정 기다려야 한다. 그래서 Event Object를 만들어서 직렬 포트 감시 thread에서 데이터가 도착하면 event를 발생시켜 read operation에서 queue에 데이터가 없어서 기다리다가도 event가 발생하면 read operation을 재개하도록 했다.


4. Unsolved Mystery and Personal Opinion
뭔가 있는데 내 프로그램도 아직 제대로 이해 못하고 있어서 그런지 정리가 안되서 말 못하겠음... 하지만 간단히 얘기하자면 아무리 thread를 써서 모든 해결책을 제시한것 같아도 직렬 포트에서 read operation시 WaitTimeout을 INFINITE으로 설정해주면 WaitCommEvent가 발생하지 않는것 같다는것...
이번 작업을 계기로 MFC말고 Windows API에 눈을 뜨기 시작했다. 여태까지 들어온 말에 의하면 Windows API는 너무 어려워서 MFC를 사용하는거라고 하지만, GUI 작업이 아니면 오히려 Windows API를 사용하는것이 더 간결한 해결책을 제시하는것 같다고 생각한다. CCriticalSection, CEvent, AfxBeginThread() 이런거 싫다... 사실은 어디까지가 MFC이고 어디까지가 Windows API인지도 잘 모르겠다...

Windows app 만들때는 .Net 쵝오 b-.-


*소스코드도 올리고 싶은 마음이 간절하나 회사에서 작업한지라... 빼돌리기 쉽지 않아 소스코드 공개는 포기했음... 별것도 아니지만 외부로 빼내려면 참 골치 아프고 눈치 보여 소스 공개는 못하는 점이 아쉽다~


Posted by Dansoonie